 |
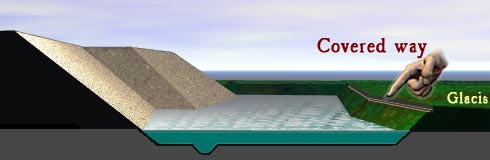
Taking the Covered Way |
Even if a suitable breach were made in the wall, enemy still holding the covered way would have inflicted heavy casualties on anyone attempting to reach that hole. Evicting the besieged from their covered way could precede making a breach in the wall. Indeed, the wise commander made sure the covered way was his before that breach was fully opened because attackers had to get through that breach as soon as it opened.
 Saps were dug approaching the covered way and, unless the defending garrison was
very weak by this time, sappers were hit with as much resistance as defenders
could muster. Any nearby outlying defensive positions had to be eliminated,
too, because as the saps progressed past them, they then flanked the saps.
Advancing attackers threw together their own little fortifications behind which
they could find some refuge from retaliations of the besieged - fall-back
positions.
Saps were dug approaching the covered way and, unless the defending garrison was
very weak by this time, sappers were hit with as much resistance as defenders
could muster. Any nearby outlying defensive positions had to be eliminated,
too, because as the saps progressed past them, they then flanked the saps.
Advancing attackers threw together their own little fortifications behind which
they could find some refuge from retaliations of the besieged - fall-back
positions.
Not surprising, seizing the covered way was sometimes the bloodiest operation of the entire siege. Following a bombardment of the covered way to soften resistance, the salient angles of the covered way were first taken, usually at sword point. If palisades put up by defenders remained intact, these had to be chopped through. The besieged were next driven from the remainder of the covered way. Once evicted, the defenders were no longer in a position to resist outside their walls. The besiegers could then construct batteries only a few meters from the walls and bring up artillery.
Taking the "body of the place" was next - with the final assault.